
Step by Step Decluttering: A Practical, Room-by-Room Way to Clear What’s Piled, Mixed, and Unused

Paper stacks on the kitchen counter, a bedroom chair covered in clothes, drawers that won’t close, storage bins holding unrelated items—this article is a step-by-step decluttering guide focused on those exact situations. It is not a mindset reset, a minimalist challenge, or a whole-house overhaul. It is a practical how-to that walks through decluttering in small, controlled stages so the work stays contained.
The scope here is deliberate. This approach works for limited time, shared households, and homes where decisions feel harder than the physical work. Each section deals with one type of space or decision at a time. You won’t be asked to imagine your ideal life or empty your entire house onto the floor.
The goal is simple: reduce visual and functional clutter by making fewer decisions at once, in a repeatable order, using real objects and real stopping points. You can start and stop without losing your place.
What follows is step by step decluttering as a process, not a purge. Each section stands on its own. You can read in order or skip to the part that matches what’s currently piled, overflowing, or mixed in your space.
Start With One Visible Surface, Not a Whole Room
Choose a surface that is already causing friction: a kitchen counter corner, the top of a dresser, a coffee table that never fully clears. This step-by-step decluttering process begins here because visible surfaces create constant visual noise, and clearing one delivers immediate relief without requiring endurance.
Stand at that surface and remove everything from it. Place items directly onto the nearest open floor or an empty chair. Do not sort yet. The only goal is to expose the surface itself so you can see its full boundary.
Wipe the surface quickly. This is not deep cleaning. A single pass is enough. The act of wiping marks the surface as active and in use.
Now pick items up one at a time and answer only one question: does this item belong on this surface when it is being used correctly? If yes, return it. If no, place it into one of three temporary piles nearby: belongs in another room, belongs in this room but not here, or has no clear home.
Do not create a “decide later” pile beyond these three. The piles are holding zones, not storage solutions. Once the surface is mostly clear, stop. You have completed a full decluttering cycle for one area. The piles can wait until the next step.
Move to Drawers That Stick, Catch, or Overflow
After clearing a surface, transition to the drawer closest to it that no longer opens smoothly or holds mixed items. Drawers fail quietly, which is why step by step decluttering works best when they’re addressed one at a time.
Open the drawer fully and remove everything. Place items on the same cleared surface you just worked on. This keeps the scope tight and visible.
Look at the empty drawer. Note its size and depth. That physical space determines what belongs there, not the category you think it should hold. This prevents overfilling later.
Pick up items one by one and place back only what fits easily without stacking or forcing. If you have to press items down or angle them, they don’t belong in this drawer anymore. Set those aside.
Group what remains loosely by use, not by perfection. Pens with pens, utensils with utensils, cables with cables. You are not organizing; you are checking capacity.
Once the drawer closes without resistance, stop. Items left out are not a failure. They are simply homeless for now. Place them back into a temporary container or return them to the earlier piles. The drawer is done, and that completion matters.
Declutter Storage Bins by Emptying Only One at a Time
Plastic bins, fabric cubes, and cardboard boxes often hold mixed items that were put away to make a room look better, not function better. Step by step decluttering treats each bin as a single project.
Choose one bin. Do not stack bins or pull everything out at once. Set the bin next to an open floor area.
Empty the bin completely. This is important. Partial emptying hides volume problems. Look inside the empty bin and decide what it realistically holds without bulging or bending.
Return items by matching the bin’s original purpose, not its current contents. If the bin was meant for winter accessories, only those go back in. If it had no clear purpose, choose one now based on the items you actually use.
Anything that doesn’t fit the purpose or capacity stays out. Do not solve it yet. Place it into a temporary holding area.
Once the bin closes easily and can be lifted without strain, stop. Labeling is optional and not required at this stage. The bin is now functional. Additional bins can be addressed later using the same process.
Work Through Clothing Piles Without Trying Everything On
Clothing piles form on chairs, at the bottom of closets, and on top of laundry machines. Step by step decluttering here avoids fitting rooms, mirrors, and long decision chains.
Start with one pile only. Place it on the bed or a cleared floor space. Do not pull from multiple locations.
Pick up each item and sort into three groups: currently worn, not worn but kept, and clearly no longer worn. You are not deciding donation logistics. You are deciding use.
Currently worn items go back into the closet or drawer immediately, even if those spaces are imperfect. This restores function first.
Not worn but kept items get folded or hung together in one section. Clearly no longer worn items go into a bag or box and are removed from the room once the pile is done.
Do not reorganize the entire closet. Stop once the pile is gone. The win here is removing loose clothing from surfaces, not creating an ideal wardrobe.
Address Paper Stacks by Limiting the Decision Types
Paper accumulates on desks, counters, and entry tables because it represents delayed decisions. Step by step decluttering reduces paper by reducing the number of decisions you make.
Gather one paper stack. Only one. Place it on a clear surface.
Create four simple categories: action needed, to file, to reference temporarily, and discard. These are broad on purpose.
Handle each paper once. Do not read deeply. Scan just enough to place it. If unsure, default to action needed.
Discard immediately into recycling or trash. Do not create a discard pile.
Place action papers into one folder or tray. Filing can happen later. Reference temporarily papers stay loose but together.
Once the stack is sorted, stop. You have contained the paper without solving everything. That containment is the goal at this stage of step by step decluttering.
Declutter Cabinets by Working From the Front Row Back
Cabinets fail when items get pushed behind other items and forgotten. Step by step decluttering inside cabinets works best when you limit how far your hands and eyes have to travel.
Open one cabinet. Only one. Start with the front row of items, the ones you can reach without moving anything else. Remove just those and place them on the counter.
Ask a single question: do these items earn their front-row position through regular use? Items used weekly or daily go back first. Arrange them so nothing blocks access.
Next, pull out the second row. These are occasional-use items. Keep only what fits without stacking dangerously or forcing doors shut. If items must be leaned, doubled, or wedged, there are too many.
The back row is last. This is where duplicates, expired items, and forgotten tools tend to hide. Remove anything you haven’t used in the last year unless it serves a clear, seasonal purpose.
Once items are returned, stop. Do not reorganize adjacent cabinets. If overflow remains, place it into a temporary holding box outside the cabinet. The cabinet itself is now functional, which is the only goal for this step.
Tackle Bathroom Storage Without Emptying the Whole Room
Bathroom clutter often lives in drawers, under-sink cabinets, and shower edges. Step by step decluttering here focuses on hygiene, expiration, and access.
Choose one storage zone: a drawer, a shelf, or the area under the sink. Remove everything from that zone only.
Group items by type: daily use, occasional use, backups, and expired or empty. Expired items leave immediately. Empty containers leave immediately.
Daily-use items go back first, placed where your hand naturally reaches. If something used daily is stored behind something used monthly, swap them.
Backups stay only if you actually use the product. If a backup exists for something you no longer like or use, it doesn’t count as necessary storage.
Occasional-use items return last, placed higher or farther back. If the space won’t close comfortably, reduce the contents rather than forcing them.
Once the zone closes easily and looks calm, stop. You do not need matching containers or labels. Function and access are enough for now.
Reduce Entryway Clutter by Limiting What Lives Near the Door
Entryways collect bags, shoes, mail, and coats because they absorb daily transitions. Step by step decluttering here prevents pileup by tightening boundaries.
Stand in the entryway and identify the physical limits: hooks, floor space, shelf width. These limits define how much belongs here.
Remove everything from the floor first. Shoes that are worn regularly can return, but only up to the space available. Excess pairs move to a closet or bedroom.
Next, address hooks and hanging items. Each hook supports one item. If two items share a hook, one must leave the entryway.
Mail and paper should not live here beyond the day it arrives. Create a small tray or folder for temporary holding, nothing larger.
Bags and accessories return last. Keep only what you use weekly. Seasonal items can be stored elsewhere.
Once the floor is visible and walking space is clear, stop. A functional entryway is not empty—it’s limited. That limit is the success point.
Sort Shared Spaces by Assigning Ownership, Not Categories
Living rooms and shared areas collect mixed items because no single person owns them. Step by step decluttering here focuses on ownership first.
Choose a shared surface or corner. Clear it completely.
Pick up each item and assign it to a person or to the household. Household items return to shared storage. Personal items leave the room and go to their owner’s space.
Do not reorganize personal spaces. Your job is only to relocate items, not solve them.
For household items, decide whether this room is their true home. Remote controls, throws, and books used here can stay. Items used elsewhere should move.
Once only shared-use items remain, arrange them loosely so each has space. Crowding means excess.
Stop when the surface is clear and usable. Shared spaces stay functional when they stop acting as storage for unresolved personal items.
Handle “No Home” Items With a Temporary Holding Zone
Every step by step decluttering process produces items with no clear home. Ignoring them causes piles to reappear.
Designate one container as a temporary holding zone. A box, basket, or bag works. This container has a limit.
Place all homeless items inside. Do not sort them yet. The rule is capacity-based: when the container is full, you must address it before continuing elsewhere.
Store the container out of main sight but accessible. This prevents visual clutter without creating denial storage.
Set a specific time later to address it, or wait until similar items accumulate. Either way, the container keeps clutter contained.
Once items are contained, stop. You have prevented spread, which is the final goal of this phase of decluttering.
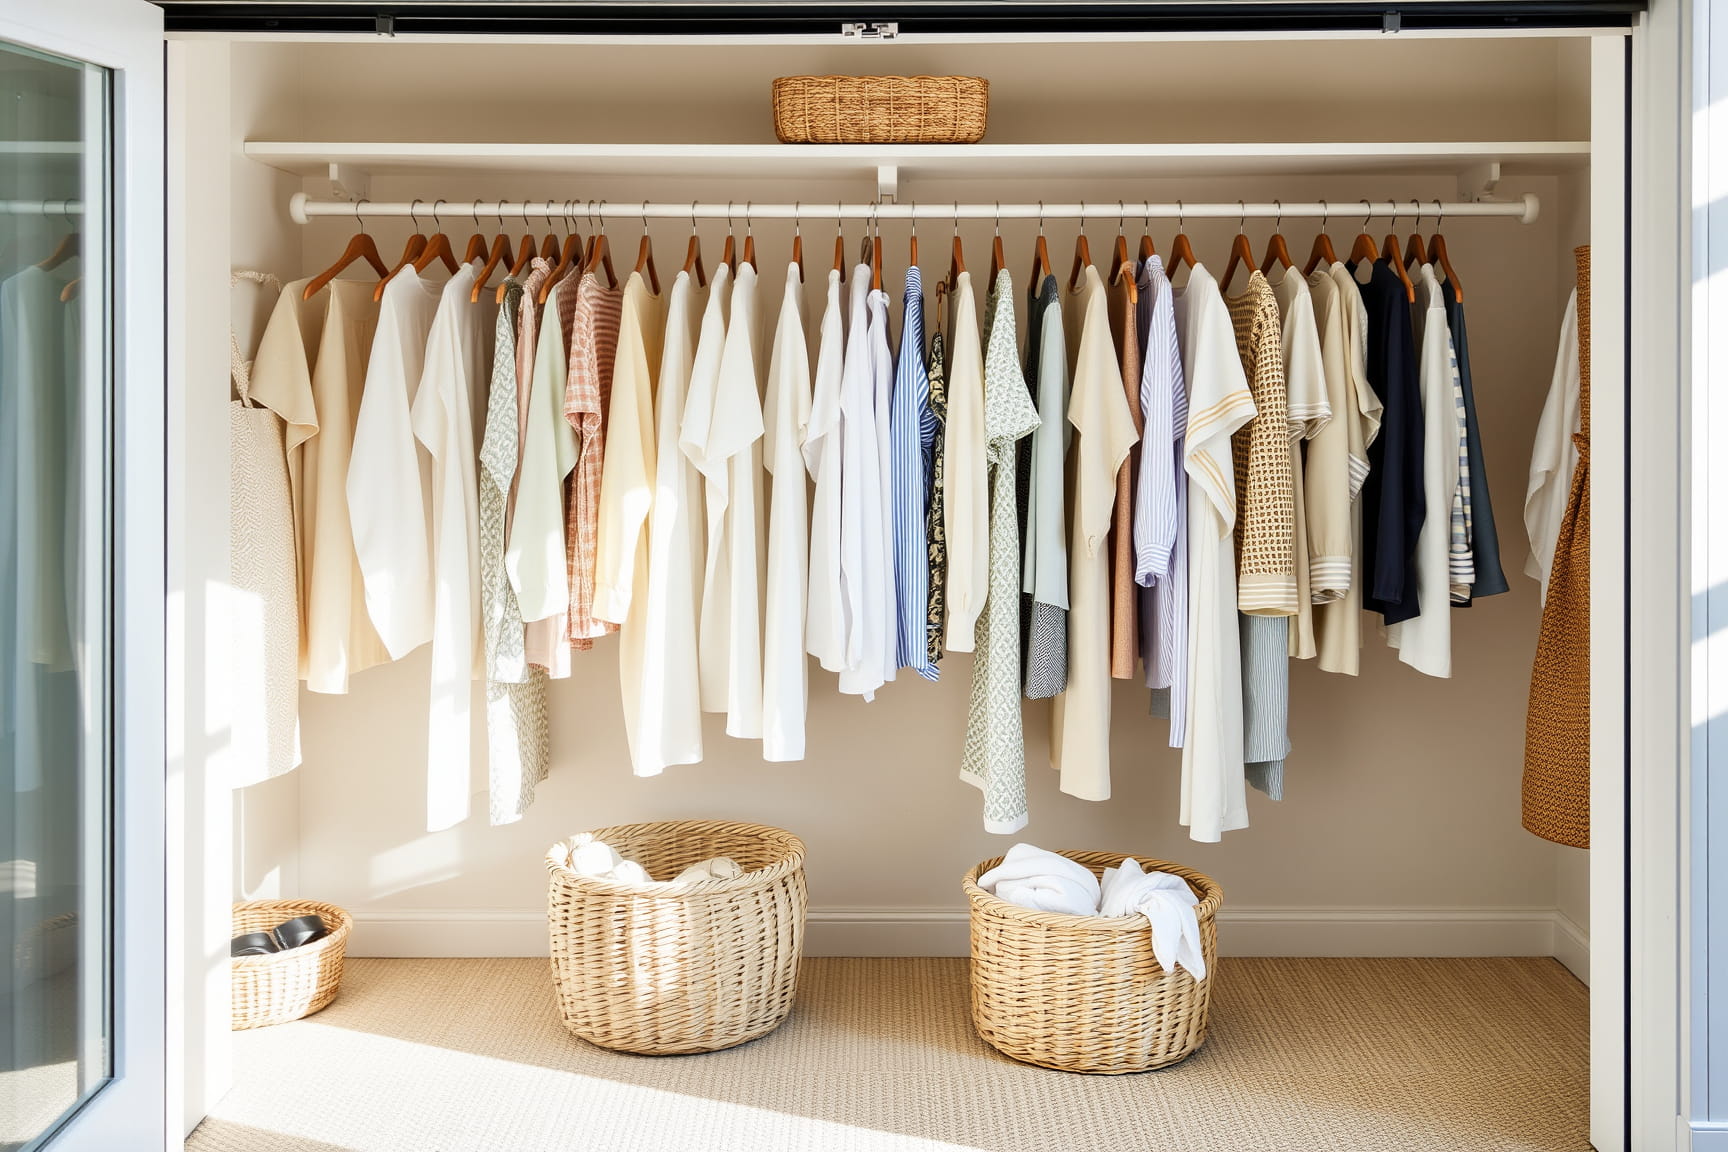
Declutter the Closet Floor Before Touching Hanging Clothes
Closet floors collect shoes, bags, bins, and clothing that didn’t get put away. Step by step decluttering starts here because the floor defines whether the closet is usable at all.
Remove everything from the closet floor. Place items just outside the closet opening so you can still see the full floor space.
Look at the empty floor. Decide what the floor is actually for. In most closets, the floor supports shoes or one low-profile bin, not loose piles.
Return shoes first. Keep only the pairs you wear in the current season. Line them up heel to wall so you can see each pair without stacking. If shoes don’t fit without overlapping, reduce the number.
Next, return any bins that truly belong on the floor. Each bin must open easily without being pulled out completely. If it can’t, it doesn’t belong there.
Loose items do not go back onto the floor. Bags, clothes, and accessories need hooks, shelves, or another room.
Once the floor is clear enough to vacuum or step into without maneuvering, stop. You do not need to organize hanging clothes yet. A clear closet floor restores access and reduces daily friction, which is enough for this stage.
Work Through Shelves by Setting a Visible Edge Line
Shelves fail when items creep forward and pile upward. Step by step decluttering uses physical boundaries to stop that creep.
Choose one shelf. Remove everything from it and wipe it quickly.
Before returning items, define the usable depth. This can be the front edge of the shelf or an imaginary line two inches back. Nothing should cross that line when returned.
Place items back starting with those used most often. Keep them in a single row. Do not stack unless items are identical and stable.
If items require stacking to fit, the shelf is over capacity. Remove the least-used items and set them aside.
Once the shelf looks calm and items are fully visible, stop. Do not adjust adjacent shelves.
This method keeps shelves readable and prevents future pileups. The shelf doesn’t need to look styled. It needs to stay within its physical limit.
Declutter the Laundry Zone to Reduce Clothing Backlog
Laundry zones accumulate clutter when clothes linger between steps. Step by step decluttering here focuses on flow, not perfection.
Start with the area on top of the washer and dryer. Remove everything. These surfaces are for active laundry only.
Return only items used during washing or folding, such as detergent or a basket. Everything else leaves the zone.
Next, address the floor. Empty baskets get stacked or stored. Full baskets get sorted immediately into wash, dry, or put away. Do not create extra categories.
If clothing regularly piles here, limit the number of baskets. Fewer containers force completion.
Once the machines and surrounding surfaces are clear, stop. You do not need to optimize routines or schedules. Clearing the zone reduces visual pressure and prevents clean clothes from turning into clutter.
Reduce Desk Clutter by Protecting One Working Area
Desks collect supplies, papers, and devices until no clear work space remains. Step by step decluttering protects one functional zone rather than the whole desk.
Choose a rectangular area large enough for your main task. Clear that area completely.
Everything removed goes to the side of the desk, not the floor.
Return only items required for daily work in that space. A keyboard, notebook, or lamp can stay. Extra tools wait.
Once the work zone is clear, stop and test it by sitting down. Adjust only what interferes.
Items left on the desk but outside the zone can be addressed later. The goal is a reliable place to work, not an empty desk.
Clear Digital Overflow Devices From Physical Spaces
Phones, tablets, chargers, and cables spill into rooms without designated homes. Step by step decluttering treats these as physical objects, not tech problems.
Gather all loose devices and accessories from one room. Place them on a surface.
Match each device with what it needs to function: charger, cable, case. Discard broken or duplicated cables immediately.
Assign each device a single home in that room. Drawers or bins work better than open surfaces.
If an item doesn’t belong to that room, move it out now.
Once devices are contained and surfaces are clear, stop. You do not need to manage digital files or settings. Physical containment is the objective at this stage.